The Original SBS4DCC "Sugar Cube" Speaker Application Notes
Last Updated 240921
|
Finally! A small speaker that will rock your world.
We pay big bucks for the finest hardware we can to get decent sound from our diminutive locos. Often we are left disappointed and wishing we had just bought another locomotive.
It is called a "Sugar Cube" because, well, it's about the same size and the enclosure was originally the color of a sugar cube. I just happen to think they are pretty sweet!
The concept of the Sugar Cube Speaker has been around for a minute or two now and many have attempted to copy our success. No matter, the Original "Sugar Cube" is still quite impressive and offers the specific advantage of maximum volume and audio quality in the minimum cube of physical space.
- 2011 - Streamlined Backshop began importing CT Elektronik and ZIMO DCC cube speakers for sale in the US.
- 2013 - Streamlined Backshop began working directly with the speaker manufacturers and introduced the line of Original "Sugar Cube" speakers under the SBS4DCC brand.
- 2015 - ESU added an 11x15mm model of this speaker to their product line and now has many different models having modular enclosures.
- 2016 - SoundTraxx and Train Control Systems added comparable models of Sugar Cube speakers to their respective product lines.
- 2017 - Atlas and InterMountain began offering the first OEM N-Scale models, the S-2 and SD40-2 respectively, having factory sound made possible by the adaptation of the Sugar Cube Speaker.
- The concept has become the defacto standard model speaker and this type of speaker is now used in nearly every new N and HO scale model from nearly every model train manufacturer.
- 2021 - SBS4DCC added the 10x20mm size that features exceptional frequency response and power handling specifications.
- 2022 - Streamlined Backshop began manufacturing the enclosures in-house using carbon fiber impregnated nylon plastic.
- 2024 - Streamlined Backshop now offers over 100 different models in five speaker sizes as well as the new "Tailor-Made" series of custom fit enclosures for specific applications.
This speaker may not fit in every installation but, if you can find the space, it is a highly recommended product.
Now you can enjoy all the sound you paid for, and then some...
Additional Information
Click on these links for additional information about this product.
Product Description and Specification
Consolidated Table of Dimensions
About Speakers & DCC Decoder Installations
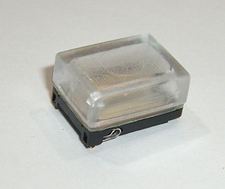
CT Elektronik and Zimo "Sugar Cubes"


The CT Elektronik "Sugar Cube" Speaker is imported from Austria from the European decoder manufacturer, Tran, a.k.a C.T. Elektronik.
The ZIMO Cube speaker is imported from Austria as well from the European decoder manufacturer, ZIMO Electronik.
 Specifications:
- 11x15mm, 11mm tall
- 8 ohm
- 1 Watts
- Sound Chamber Included
ZIMO also offers a smaller model. Since it is smaller, it is not as loud as it's big brother but pretty nice all the same.
- 12x8mm, 8mm tall
- 8 ohm
- 0.7 Watts
- Sound Chamber Included
ESU Cube Speakers


- 50321
- 50340
- 50341
- 50342
- et.al.
- 11x15mm, 4.5mm - 10.5mm tall
- 8 ohm
- 1 Watts
- Sound Chamber Included
- Optional Close-Coupled Twin Sound Chamber

TCS WOW Speakers
The TCS WOW speaker could be classified as a "sugar cube" speaker. This style of speaker is often feature in cell phones and tablets and performs slightly differently from standard speakers. This style of speaker REQUIRES mounting with a baffle to produce much sound at all, but once they are mounted they produce significantly more sound than you might expect. Try them out in your space restricted installations.


Application Notes
The CT Sugar Cube is very similar to (exactly the same as ???) the ZIMO Sugar Cube.
The ZIMO Sugar Cube comes with the chamber attached to the speaker by a thin adhesive-backed gasket.
I have tried these two ways:
1. Factory gasket attached to the body
2. Adhesive-caulked to the body
The CT Sugar Cube comes with the chamber unattached.
I have tried these three ways:
1. Super-glued to the body
2. Adhesive-caulked to the body
3. No chamber
No chamber was not really an option. Sounded horrible. The adhesive caulk was hard to work with and keep off the voice coil.
I have been using super-glue gel almost exclusively since 2014. I think this is probably the best method for attaching the box. This type of speaker has to be sealed up tight or you will get some speaker noise. See comments about this below.
I have been able to improve the sound and volume of the ZIMO models by removing the gasket and attaching the baffle with super-glue. I have found that the gasket does not always seal the chamber well and the super-glue corrects this.
As a side note, I have also milled the chamber down to obtain a .250 overall height with little effect on overall performance. I probably could have gone more but that was my target.
Attaching The Cap
I typically use a gel-type CA glue to attach the speaker to the enclosure. I just get a dollop of glue on the tip of a toothpick and trace the rim of the enclosure then gently place the speaker on the rim, contact side facing out. Placing the enclosure on a piece of double-sided tape help to keep it in place while completing the assembly process.

Speaker Body and Enclosure Assembly Demonstration
Here is a brief demonstration of how I assemble the sound chamber enclosure to the speaker body.
Additional Improvements
I have gotten a lot of positive feedback from other users and had lots of opportunities to experiment with this product.
I am continually impressed with their performance and flexibility.
Here are some additional modifications and techniques to improve sound quality, increase volume, and improve the fit of this product.
Modify The Chamber
I have been able to improve the fit and increase the applications where I can use these speakers modifying the baffle.
One method I use is to file down the sides or top as required to make the assembly fit the space I have to work with.

Another method I use is to mill or cut down the side walls to reduces the overall height of the chamber.

Another method I use is to replace the chamber with a piece of sheet styrene. Simply cut it to fit and mount is the same way as a stock chamber.


This technique work particularly well with the ZIMO cubes. Remove and replace the box with a piece of styrene but leave the gasket.
Seal The Chamber
I have been able to improve sound quality and increase the volume of these speakers even more by improving the seal between the baffle and speaker body.
One method I use is to coat the seam with liquid electrical tape. Other substances might work well also. The idea here is make the mounting of the baffle as air tight as possible.

Another method I have used is to wrap the entire very tightly with plain old masking tape. I used the green stuff but any variety will work. I have not tried other types of tape. I suspect more dense varieties like electrical or duct tape will muffle the sound and diminish the benefit of this technique.
This technique is especially useful with the ZIMO brand. They use a foam gasket between the sound chamber and speaker body. They adhesive does not always hold well and internal pressure is reduced from air escaping through the sides. The tape holds the assembly together tightly and the improvement is "gaping mouth" noticeable.

Making The Wire Connections
Making wire connections to the 11x15 cube is easy. Simply connect to the little tabs on either side of the base.

Making wire connections to the 8x12 cube is equally easy.

Simply connect to the two metal plates around the edge of the base.
The magnet on this is very powerful and tends to draw the speaker to the iron tip before I can get the wire attached. I have found two ways to get this done.
Mounting and Orientation
The sound comes out the magnet-side of the speaker.
I have have had good results mounting these in nearly every orientation.
I did notice a big improvement with the smaller Zimo unit when the magnet was pressed tight against a solid surface.
In all cases, I have found it is absolutely necessary to secure the speaker in some manner. They vibrate a lot when generating sound and this has a negative effect on sound quality if the speaker is not secured.
I have used adhesive caulk and double sided tape for this. I am sure glue would work too.
It is very important to insulate the mounting surface if the speaker will be mounted such that metal face or mounting tabs will cause a short circuit. If this face or the solder tabs contact the frame or other conductive surface, you will likely cause damage to the decoder and speaker.
What's That White Stuff?
No, it's not mold. It's Elmer's General Purpose Glue. It comes in a glue stick unlike that white liquid stuff you ate as a kid on a triple dog dare...

I have been manufacturing my own enclosures since 2022. The glue is applied to the bed of the printer to bond the first layer of the extruded plastic filament to the printer bed.
The glue residue is harmless and generally has no affect on the quality or functionality of the part.
The glue residue can be removed easily by running the enclosure under some hot water for a second or two.
You should do this BEFORE you assemble the enclosure to the speaker of course...
Inside Out Or Outside In?
I am frequently asked if the speaker should be assembled with the voice coil in or out.
I design the SBS4DCC Sugar Cube baffles so that the voice coil faces into the chamber for several reasons.
First, my original goal in searching for this product was to find a speaker that provides maximum volume (as in decibels), superior sound quality (as in frequency range), minimum footprint (as in cubic inches under the shell), with the last goal being the key driver in nearly all cases. You can't add more volume in a scale model.
It's hard to argue the product does not achieve those goals, at least in smaller scales like N and HO, no matter what orientation you build or mount them in.
Second, the speaker frame of each size has a natural mounting face that is ideal for securing the baffle to. This surface is easily identified by the plastic or metal flange applied to the top face of the speaker frame. My boxes attach to the face of this flange as opposed to around the frame to minimize the footprint of the speaker. The box must be physically larger to go around the frame.
Third, the voice coil is fully protected by the baffle box when it faces in and completely exposed when it faces out, at least with my basic box design. Most solutions that allow it to face out and protect the voice coil, seal the back face to contain the back sound wave will likely get larger.
There are groups and experts who swear by it either way.
I dunno...
Sound is very personal and incredibly subjective.
Do what you think sounds best to you.
I got a response from a certain digital tracks company tech support department once that read "just experiment and have fun".
I actually think that answer applies here as much as I loathe repeating it.
Here is a brief demonstration illustrating the difference between assembling the voice coil in or out on two different variations of the SBS4DCC Sugar Cube baffle.
This is not a controlled test. I offer no empirical data. It's just a brief demonstration to let you decide if its worth experimenting with.
The acoustics of a model shell and deviations of a sound file are sure to have an affect as well so take it for what its worth.
About ten cents... Ha!
The "Hyperbaric" Effect
"Two 8 Ohm Eckig (CT Electronik) 15 x 10 mm cube speakers in parallel give me the most stunning sound - much better than any so called bass boost speakers - especially if they are facing each other in a "hyperbaric" configuration . . . and they take up less room.
The sound is nothing short of amazing.
There are lots of vids there, but here's one with the two mounted side by side in the roof of an Atlas GP 7, just facing down inside the body
"The sound is nothing short of amazing.
"(Max is also very pleased with the effect of) two mounted side by side in the roof of an Atlas GP 7, just facing down inside the body."
Max Wright… Australia

As of this 2024 update, I can longer find Max's original video demonstration of this configuration but here is a version of this model in a sound car.
A sample video from the Backshop demonstrating the installation in a N Scale Sound car.
Fitting the Hyperbaric Chamber
I have received a couple of queries about fitting the speakers in the Hyperbaric chamber.
It is a tight fit. I wanted them tight eliminate the end seam as a source of air leakage.
On some models of speakers there are plastic protrusions on the end of the speaker that interfere with the side walls of the speaker chamber.
I just use a hobby knife to remove the protrusions and the speaker will slip right in to the chamber.

After I do a test fit, I attach the speaker wires from the decoder in series to the contacts on the speaker as shown here.

Then I glue the speaker to the chamber with Gel-type Super Glue.

And finally I seal the seam with more glue or with liquid electrical tape.

Fitting the Isobaric Chamber
The Isobaric Sound Chamber is offered with the audiophile in mind. This is a concept speaker baffle that should be experimented with to find the optimal configuration.
The Isobaric Chamber is about 1-1/4" long as supplied. The optimal length can vary based on many factor including the speaker size, the physical decoder amplifier, the sound file selected, and the mounting and orientation, just to name a few.
The chamber is sized to allow the upper speaker to slide in and out to adjust the distance between the two speakers. The body can be cut down as desired to reduce the footprint and volume of the final configuration.
I don't know the optimal size for your application.
Sound is very personal so YOU should experiment to find the sound that YOU like.

How to Assemble the Isobaric Chamber
Begin by attaching the two included speakers to the upper and lower baffles with super-glue.

Once the super-glue is dry, attach wire leads to the upper speaker.
I like to use one 3" and one 4" lead. I attach the Long Lead to the Left Side of the speaker. LONG IS LEFT is easy to remember once everything is assembled and glued together.

Then drill a #61 or larger hole in each side of the chamber.
I like to locate them in the center of the long side in the corner where the lower baffle transitions to the larger body but the actual location can be wherever you choose.

Now pass the upper speaker wires through the holes in the lower baffle (like threading a needle).
Since I am wiring the speakers in Series, I pass the left wire through the right hole and right wire through the left hole.
NOTE: In this example, I am wiring the speaker pair in Series which will result in a combined speaker impedance of 16 ohms.
Please refer to my page Wiring Multiple Speakers To A Decoder and the product manual for the decoder you will be using to determine the optimal speaker impedance for your application.

Then trim the LEFT IS LONG wire as short as possible and prep the end for soldering.
Be sure to save the scrap of wire for use in a later step.

Now solder the LEFT IS LONG lead to the right terminal of the lower speaker and push any excess wire back into the lower baffle.

Attach the scrap of wire from the previous step (or a new piece if if it is not long enough) to the right terminal of the lower speaker.

Now apply a bead of super-glue around the seam where the upper and lower baffles meet to seal and secure the two components.

And finally, apply a drop of super-glue on the holes in the lower baffle to completely seal the sound chamber.
True, it is probably not critical to perform the last two steps but to be thorough...

Once the glue is dry, connect the speaker assembly to your favorite sound decoder and enjoy the sweet sounds of a SBS4DCC "Sugar Cube" Speaker.

Here is a great explanation of the design that really helps to appreciate the potential of the concept.
White Noise
I have had feedback from a couple of users (and experienced it myself) about excessive speaker noise and "crackle" in their installation.
I have used a hundred of these with ESU LokSound, Soundtraxx, and Zimo decoders and can say with great confidence as well as offer countless video testimonies that this is not typical. You should expect to be amazed.
I have replaced countless factory Digitrax SDN144xxx speakers and even a few MRC drop-in decoder speakers and achieved the same type of results.
I have found two consistent situations when this occurs but cannot say these are the only causes.
First, I have found that getting the speaker sealed air-tight is imperative. Glue it and tape. AIR TIGHT! I will say it again. AIR TIGHT! I put on of these in a SD90/43MAC. After several months, the adhesion of the gasket degraded to a point where the sound quality became unacceptable. I wrapped it up tight in tape and the difference was nothing short of amazing. I will say it again. AIR TIGHT!
Second, I have had at least three instances where the speaker made a "crackle" noise after it was delivered to the customer. I test the install here, perfect. They get it, junk. In all cases the consistent factor are that the install used a LokSound Select Micro with "Suger Cube" speaker tested on an MRC Prodigy and the user ran it on a Digitrax command station.
I was able to solve the problem by turning off several CV values associated with DC Braking, SUSI, Railcom compatability, and non-DCC protocols.
The specific CV values are as follows:
13 = 0
14 = 0
27 = 0
28 = 0
29 = 6*
47 = 1
49 = 19
50 = 0
124 = 4
254 = 0
* - this will set to short address so will need to reset the long address as desired.
NOTE: The values shown are for an ESU LokSound Select Micro decoder only. Consult the manual for any other model or brand.
I need to say this is not tested or proven beyond three limited experiences so it is offered only as a "you might try this" solution.
In these three cases, this solution did resolve the problem. The last of which was an intentional experiment after the problem was identified. This test was performed with a client who lives two miles from me. Tested OK on my kit. Loco was commissioned on a D-Zephyr home layout and run regularly on a D-powered N-trak setup. Sounded and ran so bad on his that it made his boy cry. I adjusted these settings with no other changes and the loco has now run perfectly on at least different D-powered layouts.
Just one mans experience...
It has been suggested by ESU that increasing the voltage to the layout may resolve the problem as well.
Installer Steve's High-Altitude Mod
We have had reports of poor volume from customers operating models in high altitudes (think Colorado...). They send the speaker or model to Steve in Illinois and everything's fine. Back and forth, trade recordings and take measurements to validate, sure enough the problem is real.
The solution is simple enough... drill a small (#60-#80) hole in the end of the baffle...
"Sugar Cube" Speakers In Action
Here are few demonstrations of this speaker in action in a wide variety of models to demonstrate the capability of the speaker with different type of prime movers.
N Scale Kato F3A-B-A each with an ESU LokSound Select Micro DCC Decoder with a Zimo 12x8 "Sugar Cube" Speaker and some cool LED Lighting.
N Scale Con-Cor Pioneer Zephyr with an ESU LokSound Select Micro DCC Decoder with a CT Elektronik "Sugar Cube" Speaker.
N Scale InterMountain Cab Forward with an ESU LokSound Select Micro DCC Decoder with a Zimo 15x11 "Sugar Cube".
N Scale Kato GS-4 Daylight 4-8-4 "War Baby" with an ESU LokSound Select Micro DCC Decoder with a CT Elektronik "Sugar Cube" Speaker and upgraded LED Lighting.
N Scale Kato F40PH with an ESU LokSound Select Micro DCC Decoder with a CT Elektronik "Sugar Cube" Speaker and lots of LED Lighting controlled by six functions made possible with a SBS4DCC Aux 3-4 Function Board.